异常
Java异常类层次结构图概览

Exception 和 Error 有什么区别?
在Java中,所有的异常类都有一个共同的祖先:java.lang.Throwable
Throwable类有两个重要的子类:
Exception- 程序本身可以处理的异常,可以通过
try-catch进行捕获。 Exception又分为Checked Exception(受检查异常,必须处理)和Unchecked Exception(不受检查异常,可以不处理)
- 程序本身可以处理的异常,可以通过
Error- 属于程序无法处理的错误,不建议通过
try-catch捕获 - 例如JVM虚拟机运行错误(
Virtual MechineError)、虚拟机内存不够错误(OutOfMemoryError)、类定义错误(NoClassDefFoundError)等,这些异常发生时,JVM一般会选择线程终止
- 属于程序无法处理的错误,不建议通过
Checked Exception 和 Unchecked Exception有什么区别?
checked Exception受检查异常,Java代码在编译的过程中,如果受检查异常没有被catch捕获或者throws关键字处理的话,就没有办法通过编译

除了RuntimeException及其子类之外,其余的Exception类及其子类都属于受检查异常
常见的受检查异常:IOException、ClassNotFoundException、SQLException等等
Unchecked Exception不受检查异常,Java代码在编译的过程中,我们即使不处理不受检查异常也可以正常通过编译
RuntimeException及其子类都统称为非受检查异常,常见的如下:
NullPointerException(空指针异常,NPE)IllegalArgumentException(参数异常,比如方法传入形参类型错误)NumberFormatException(字符串转换为数字格式异常,IllegalArgumentException的子类)ArrayIndexOutOfBoundsException(数组下标越界异常)ClassCastException(类型转换异常)ArithmeticException(算术异常)SecurityException(安全异常,例如权限不够)UnsupportedOperationException(不支持的操作异常,例如重复创建同一用户)- ……还有很多不受检查异常

Throwable类常用方法
/**
 * 返回异常发生时的简要描述
 * @return
 */
public String getMessage() {
    return detailMessage;
}

/**
 * 返回异常发生时的详细信息
 * @return
 */
public String toString() {
    String s = getClass().getName();
    String message = getLocalizedMessage();
    return (message != null) ? (s + ": " + message) : s;
}

/**
 * 返回异常对象的本地化信息,使用Throwable的子类覆盖这个方法,可以生成本地化信息
 * 如果子类没有覆盖该发方法,则该方法返回的信息与getMessage()返回的结果相同
 * @return
 */
public String getLocalizedMessage() {
    return getMessage();
}

/**
 * 在控制台打印Throwable对象封装的异常信息
 */
public void printStackTrace() {
    printStackTrace(System.err);
}
try-catch-finally?
try块:用于捕获异常,可后接零个或多个catch块,如果没有catch块,则必须跟一个finally块catch块:用于处理try捕获到的异常finally块:无论是否捕获或处理异常,finally块内的语句都会执行,当在try块或catch块中遇到return语句时,finally语句块将在方法return前被执行
try {
    System.out.println("Try to do something.");
    throw new RuntimeException("RuntimeException");
} catch (Exception e) {
    System.out.println("Catch Exception: " + e.getMessage());
} finally {
    System.out.println("Finally");
}
运行结果
Considerations千万不要在
finally块中使用return!当try语句和finally语句中都有return语句的时候try块中的return会被忽略,为什么呢?这是因为**try块中的return返回值会先被暂存在一个本地变量中,当执行到finally块中的return之后,这个本地变量的值就变成了finally块中return的返回值**
在JVM官方文档中明确提到了相关内容

演示
public static void main(String[] args) {
    System.out.println(func(5));
}
public static int func(int value) {
    try {
        return value * value;
    } finally {
        if (value == 5) {
            return 0;
        }
    }
}如上代码所示try和finally中都定义了return语句,调用方法时传入5,您猜怎么着,输出的结果并不是25,而是0

验证了上面所说的,所以不要在finally中写return语句
finally块中的代码一定会执行吗?
不一定,以上方try-catch-finally中的代码举例
public static void main(String[] args) {
    try {
        System.out.println("Try to do something.");
        throw new RuntimeException("RuntimeException");
    } catch (Exception e) {
        System.out.println("Catch Exception: " + e.getMessage());
        System.exit(1);
    } finally {
        System.out.println("Finally");
    }
}在finally之前虚拟机就被终止运行的话,是不会执行到finally块中的语句的,上方代码直接在catch块中直接终止程序,程序自然就不会走到finally块
运行结果:

如何使用try-with-resources代替try-catch-finally?
try-with-resources的适用范围:实现任何java.lang.AutoCloseable或者java.io.Closeable的对象例:
Scanner.java
public final class Scanner implements Iterator<String>, Closeable {
    // ......
}
关闭资源和
finally块的执行顺序:在try-with-resources语句中,任何catch或finally块在声明的资源关闭后运行
在Java种类似于InputStream、OutputStream、Scanner、PrintWriter等资源都需要我们调用close()方法来手动关闭,一般情况下都是通过try-catch-finally语句来实现这个需求
Scanner sc = null;
try {
    sc = new Scanner(new File("F://read.txt"));
    while (sc.hasNext()) {
        System.out.println(sc.nextLine());
    }
} catch (FileNotFoundException e) {
    System.out.println(e.getMessage());
} finally {
    if (sc != null) {
        sc.close();
    }
}编译器会提醒我们使用try-with-resources

使用Java7之后的try-with-resources语句改造上面的代码
try (Scanner sc = new Scanner(new File("F://read.txt"))) {
    while (sc.hasNext()) {
        System.out.println(sc.nextLine());
    }
} catch (FileNotFoundException e) {
    System.out.println(e.getMessage());
}如果要关闭多个资源,使用try-with-resources通过分号进行分隔即可,可以在try-with-resources块中声明多个资源
try (Scanner sc = new Scanner(new File("F://read.txt"));
     BufferedInputStream bin = new BufferedInputStream(Files.newInputStream(new File("input.txt").toPath()));
     BufferedOutputStream bout = new BufferedOutputStream(Files.newOutputStream(new File("out.txt").toPath()))) {
    while (sc.hasNext()) {
        System.out.println(sc.nextLine());
    }
    int b;
    while ((b = bin.read()) != -1) {
        bout.write(b);
    }
} catch (IOException e) {
    System.out.println(e.getMessage());
}
注意
- 不要把异常定义为静态变量,因为这样会导致异常栈信息错乱,每次手动抛出异常,我们都需要手动
new一个异常对象抛出 - 建议抛出更加具体的异常比如字符串转换为数字格式错的的时候应该抛出
NumberFormatException而不是父类IllegalArgumentException
泛型
泛型是什么?作用?
Java泛型(Generics)是JDK5中引入的一个新特性,使用泛型参数,可以增强代码的可读性以及稳定性
编译器可以对泛型参数进行检测,并且通过泛型参数可以指定传入的对象类型,例如:
ArrayList<Integer> arrayList = new ArrayList<>();
上面这段代码指明了该ArrayList对象只能传入Integer对象,如果传入其他类型的对象就会报错
public class ArrayList<E> extends AbstractList<E>泛型的使用方式?
三种:泛型类、泛型接口、泛型方法
泛型类
public class Generic<K, V> {
    private K key;
    private V value;

    public Generic() {
    }

    public Generic(K key, V value) {
        this.key = key;
        this.value = value;
    }

    public void setKey(K key) {
        this.key = key;
    }

    public void setValue(V value) {
        this.value = value;
    }

    public K getKey() {
        return key;
    }

    public V getValue() {
        return value;
    }

    @Override
    public String toString() {
        return "Generic{" + "key=" + key + ", value=" + value + '}';
    }
}
实例化泛型类
Generic<Integer, String> generic = new Generic<>(1, "value=1");泛型接口
public interface IGenerator<K, V> {
    public K method1();
    public V method2();
}
实现泛型接口,不指定类型
public class GeneratorImpl<K, V> implements IGenerator<K, V> {

    @Override
    public K method1() {
        return null;
    }

    @Override
    public V method2() {
        return null;
    }
}
实现泛型接口,指定类型
public class GeneratorImpl<K, V> implements IGenerator<String, Integer> {

    @Override
    public String method1() {
        return "I am method1()";
    }

    @Override
    public Integer method2() {
        return 2;
    }
}
泛型方法
public static <E> void printArray(E[] inputArray) {
    for (E element : inputArray) {
        System.out.print(element + " ");
    }
    System.out.println();
}
测试
Integer[] integers = new Integer[]{1, 2, 3, 4, 5};
String[] strings = new String[]{"one", "two", "three"};
printArray(integers);
printArray(strings);
Considerations
public static <E> void printArray(E[] inputArray)一般被称为静态泛型方法- 在
Java中泛型只是一个占位符,必须在传递类型之后才能使用。 - 类在实例化时才能真正的传递类型参数,由于静态方法的加载优先于类的实例化,即类中的泛型还没有传递真正的类型参数,静态方法的加载已经完成了,所以静态泛型方法是没有办法使用类上声明的泛型的,只能使用自己声明的
<E>
反射
什么是反射?
是框架的灵魂,因为其赋予了我们在运行时分析类以及执行类中方法的能力
通过反射我们可以获取和调用任意一个类所有属性和方法
应用场景?
例如Spring、SpringBoot、MyBatis等框架都大量使用了反射机制
这些框架中大量使用了动态代理,而动态代理的实现也依赖反射
通过JDK实现动态代理,Method反射类调用指定的方法
import java.lang.reflect.InvocationHandler;
import java.lang.reflect.InvocationTargetException;
import java.lang.reflect.Method;

public class DebugInvocationHandler implements InvocationHandler {

    /**
     * 代理类中的真实对象
     */
    private final Object target;

    public DebugInvocationHandler(Object target) {
        this.target = target;
    }

    @Override
    public Object invoke(Object proxy, Method method, Object[] args) throws InvocationTargetException, IllegalAccessException {
        System.out.println("before method " + method.getName());
        Object invoke = method.invoke(target, args);
        System.out.println("after method " + method.getName());
        return invoke;
    }

}
此外,在Java中,注解的实现也使用到了反射
反射的优缺点?
优点
使代码更灵活,为各种框架提供开箱即用的功能提供了便利
缺点
使我们在运行时有了分析类的能力,但是也增加了安全问题,比如可以无视泛型参数的安全检查(泛型参数的安全检查发生在编译时)
注解
注解是什么?
Annotation(注解),是JDK5.0引入的新特性,可以看作是一种特殊的注释,主要用于修饰类、方法或者变量,提供某些信息供程序在编译或运行时使用

注解的本质是继承了Annotation的特殊接口
@Target(ElementType.METHOD)
@Retention(RetentionPolicy.SOURCE)
public @interface Override {
}@interface:表示实现了Annotation接口
Java中内置的注解
一共有7个,3个在java.lang中,4个在java.lang.annotation中
作用在代码上的注解
@Override:检查该方法是不是重写方法,如果发现其父类或者引用的接口中没有该方法时就会报编译错误@Deprecated:标记过时方法,如果使用该方法会报编译警告@SuppressWarnings:指示编译器去忽略注解中声明的警告
作用在其他注解的注解(元注解)
@Retention:标识这个注解怎么保存,是只在代码中,还是编入class文件中,或者是在运行时可以通过反射访问@Documented:标记这些注解是否包含在用户文档中@Target:标记这个注解应该是哪种Java成员@Inherited:标记这个注解是继承于哪个注解类(默认 注解并没有继承于任何子类)
从Java7开始,额外新增了3个注解
@SafeVarargs:Java开始支持,忽略任何使用参数为范型变量的方法或构造函数调用产生的警告@FunctionalInterface:Java8开始支持,标识一个匿名函数或函数式接口@Repeatable:Java8开始支持,标识某注解可以在同一个声明上使用多次
Annotation架构
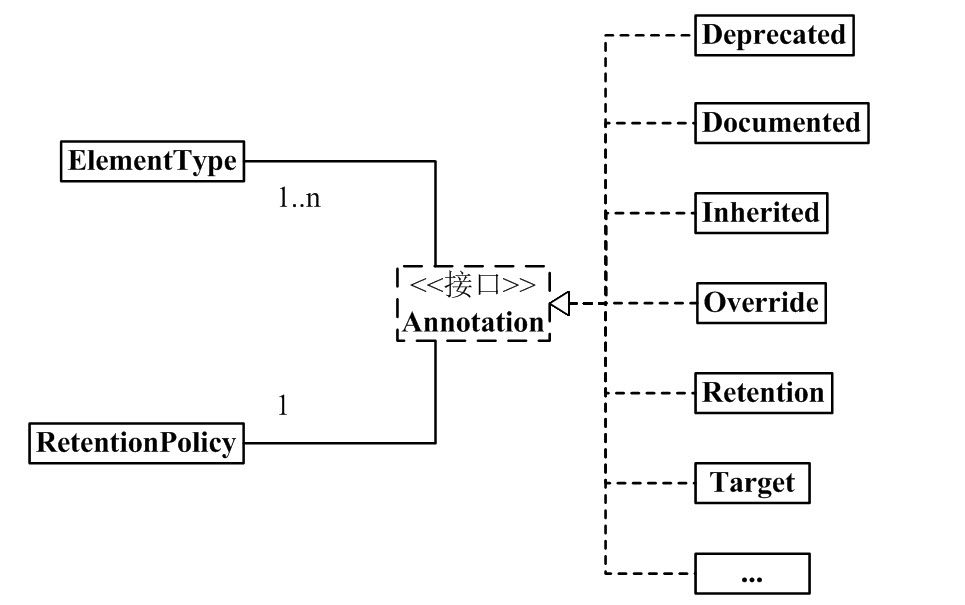
左边
1个Annotation对象,都会有唯一的RetentionPolicy属性,可以有1~n个ElementType属性
右边
Annotation有许多实现类, 包括Deprecated、Documented、Inherited等
Annotation的每一个实现类都和1个RetentionPolicy属性和1~n个ElementType属性相关联
组成部分
java Annotation有3个非常重要的主干类
Annotation.java
package java.lang.annotation;
public interface Annotation {
    boolean equals(Object obj);

    int hashCode();

    String toString();

    Class<? extends Annotation> annotationType();
}
ElementType.java
package java.lang.annotation;
public enum ElementType {
    TYPE,

    FIELD,

    METHOD,

    PARAMETER,

    CONSTRUCTOR,

    LOCAL_VARIABLE,

    ANNOTATION_TYPE,

    PACKAGE,

    TYPE_PARAMETER,

    TYPE_USE
}
RetentionPolicy.java
package java.lang.annotation;
public enum RetentionPolicy {
    SOURCE,

    CLASS,

    RUNTIME
}
说明
Annotation就是个接口ElementType是Enum枚举类型,其用来指定Annotation的类型- 当
Annotation里与某个ElementType关联,意味着Annotation具有了某种用途,例如一个Annotation对象的ElementType是METHOD类型,则该Annotation只能用来修饰方法
- 当
RetentionPolicy是Enum枚举类型,其用来指定Annotation的策略,不同RetentionPolicy类型的Annotation的作用域不同- **类型为
SOURCE**:Annotation仅存在于编译器处理期间,在编译器处理完后就没用了,例如@Override(重写),被该注解修饰的方法会在编译期间进行检查,如果发现其父类或者引用的接口中没有该方法时就会报编译错误,编译器处理完之后他就没用了。 - **类型为
CLASS**:编译器将Annotation存储于类对应的.class文件中(字节码文件),是Annotation的默认行为 - **类型为
RUNTIME**:编译器将Annotation存储与.class文件中,并且可由JVM可读
- **类型为
通用Annotation定义
@Documented
@Target(ElementType.TYPE)
@Retention(RetentionPolicy.RUNTIME)
public @interface MyAnnotation {
}
说明
**
@interface**:实现了java.lang.annotation.Annotation接口,即该注解就是一个Annotation,定义Annotation时@interface是必须的
注意:使用
@interface定义注解后,该注解不能继承其他注解或接口**
@Documented**:类和方法在缺省情况下是不会出现在javadoc中的,如果用@Documented修饰该Annotation,则表示其可以出现在javadoc中@Target:用来指定Annotation的类型属性,里面就是上面所说的ElementType,类型指定为TYPE,意味着该Annotation(MyAnnotation)是用来修饰类、接口(包括注释类型)或枚举声明的注解此外,如果没写
@Target则该Annotation可以用于任何地方**
@Retention**:指定该Annotation的策略是RUNTIME,编译器会将该Annotation信息保存在.class文件中,并能被JVM虚拟机读取
注解的解析方法有哪些?
注解只有被解析后才会生效,常见的解析方法有两种:
- 编译期直接扫描:编译器在编译Java代码的时候扫描对应的注解并处理,比如被
@Override注解修饰,编译器在编译期间就会检查当前的方法是否重写了父类对应的方法 - 运行期间通过反射处理:例如框架中自带的注解:
Spring中的@Value、@Component都是通过反射进行处理的
序列化和反序列化
什么是序列化&反序列化?
如果我们需要持久化Java对象,比如将其保存在文件中,或者在网络传输Java对象的时候,这些场景都需要用到序列化
- 序列化:将对象转化成二进制字节流的过程
- 反序列化:将序列化生成的二进制字节流转换成数据结构或对象的过程
常见的应用场景:
- 对象在进行网络传输(比如远程方法调用
RPC的时候)之前需要先被序列化,接收到序列化的对象之后需要在进行反序列化 - 将对象存储到文件之前需要进行序列化,将对象从文件中读取出来需要进行反序列化
- 将对象存储到数据库(例如
Redis)之前需要用到序列化,将对象从缓存数据库中读取出来需要反序列化 - 将对象存储到内存之前需要进行序列化,从内存中读取出来之后需要进行反序列化
序列化协议对应于TCP/IP 四层模型的哪一层?
TCP/IP四层模型(标红的是OSI7层协议模型):
- 应用层
应用层:为计算机用户提供服务表示层:数据处理(编解码、加密解密、压缩解压缩)会话层:管理(建立、维护、重连)应用程序之间的会话
传输层:为两台主机进程之间的通信提供通用的数据传输服务网络层:路由和寻址(决定数据在网络的游走路径)- 网络接口层
数据链路层:帧编码和误差纠正控制物理层:透明地传送比特流传输
可以看到,表示层做的事情就是对应用层的用户数据进行处理转换为二进制流,反过来就是将二进制流转换成应用层的用户数据,对应了序列化和反序列化所做的事情。
OSI7层模型中的应用层、表示层、会话层都对应TCP/IP四层模型的应用层,所以序列化和反序列化都属于TCP/IP协议应用层的一部分
常见的序列化协议
JDK自带的序列化方式一般不会用,因为序列化效率低且存在安全问题,比较常用的序列化协议:Hession、Kryo、Protobuf、ProtoStuff,这些都是基于二进制的序列化协议
JDK自带的序列化方式
实现java.io.Serializable接口
import java.io.Serializable;

public class RpcRequest implements Serializable {
    private static final long serialVersionUID = -7184009336509858070L;
}
serialVersionUID有什么用?
序列化号serialVersionUID属于版本控制的作用,在进行反序列化时,会检查serialVersionUID是否和当前类的serialVersionUID一致,如果不一致就会抛出InvalidClassException异常,强烈建议每个序列化类都手动指定其serialVersionUID,如果不手动指定,编译器就会生成默认的serialVersionUID
serialVersionUID被static修饰符修饰了,为什么还会被序列化?
static修饰的变量时静态变量,位于方法区,本身是不会被序列化的,但是serialVersionUID的序列化做了特殊处理,在序列化时,会将serialVersionUID序列化到二进制字节流中,在反序列化时,也会解析它并做一致性判断
官方文档中的描述:
A serializable class can declare its own serialVersionUID explicitly by declaring a field named
"serialVersionUID"that must bestatic,final, and of typelong
如果想要显式地指定
serialVersionUID,则需要在类中使用static和final关键字来修饰一个long类型的变量,变量名字必须为serialVersionUID也就是说,
serialVersionUID只是用来被JVM识别,实际并没有被序列化

如果有些字段不想进行序列化怎么办?
对于不想进行序列化的变量,可以使用transient关键字来修饰
transient关键字的作用是:阻止实例中那些用词关键字修饰的变量序列化,当对象反序列化时,被transient修饰的变量值不会被持久化和恢复
transient只能修饰变量,不能修饰类和方法transient修饰的变量,在反序列化后变量值将会被置成类型的默认值,例如int型的变量在反序列化后的结果就是0static变量因为不属于任何对象(Object),所以无论有没有transient关键字修饰,都不会被序列化
为什么不推荐使用JDK自带的序列化?
原因如下:
- 不支持跨语言调用:如果调用的是其他语言开发的服务的时候就不支持了
- 性能差:相比于其他序列化框架性能更低,主要原因是序列化后的字节数组体积较大,导致传输成本加大
- 存在安全问题:序列化和反序列化本身并不存在问题,但是当输入的反序列化的数据可被用户控制,那么攻击者即可通过构造恶意输入,让反序列化产生非预期的对象,在此过程中执行构造的任意代码
I/O
IO流?
IO即Input/Output,输入和输出,数据输入到计算机内存的过程就是输入,反之输出到外部存储的过程(例如数据库、文件、远程主机等)就是输出。数据传输过程类似于水流,因此称为IO流。IO流在Java中分为输入流和输出流,而根据数据的处理方式又分为字节流和字符流
在Java中,IO流的40多个类都是从以下4个抽象类基类中派生的
InputStream/Reader:所有输入流的基类,前者是字节输入流,后者是字符输入流OutputStream/Writer:所有输出流的基类,前者是字节输出流,后者是字符输出流
字节流
InputStream(字节输入流)
InputStream用于从源头(通常是文件)读取数据(字节信息)到内存中,java.io.InputStream抽象类是所有字节输入流的父类

常用方法:
read():返回输入流中下一个字节的数据,返回的值在0~255之间,如果未读取任何字节,则代码返回-1,代表文件结束read(byte b[]):从输入流中读取一些字节存储到数组b中,如果数组b的长度为零,则不读取,如果没有可用字节读取,则返回-1,如果有可用字节读取,则最多读取的字节数等于数组b的长度(b.length),返回读取的字节数。这个方法等价于:read(b, 0, b.length)read(byte b[], int off, int len):在read(byte b[])方法的基础上增加了off参数(偏移量)和len参数(要读取的最大字节数)skip(long n):忽略输入流中的n个字节,返回实际忽略的字节数available():返回输入流中可以读取的字节数close():关闭输入流释放相关的系统资源
在java9开始,InputStream新增了多个方法:
readAllBytes():读取输入流中的所有字节,返回字节数组readNBytes(byte[] b, int off, int len):阻塞直到读取len个字节transferTo(OutputStream):将所有字节从一个输入流传递到一个输出流
FileInputSstream是一个较为常用的字节输入流对象,可直接指定文件路径,可以直接读取单字节数据,也可以读取到字节数组中
try(InputStream inputStream = new FileInputStream("src/main/input.txt")) {
    // available():返回输入流中可以读取的字节数
    System.out.println("Number of remaining bytes: " + inputStream.available());
    int content;
    // skip(long n):忽略输入流中的n个字节,返回实际忽略的字节数
    long skip = inputStream.skip(2);
    System.out.println("The actual number of bytes skipped: " + skip);
    System.out.println("The content read from file: ");
    while((content = inputStream.read()) != -1) {
        System.out.println((char) content);
    }
} catch (IOException e) {
    System.out.println(e.getMessage());
}
input.txt的内容:

输出结果
Number of remaining bytes: 106
The actual number of bytes skipped: 2
The content read from file:
llo, this is my input.txt file.
This is my Email: 983480256@qq.com
This is my phone number:13666666666通常不会直接单独使用FileInputStream,通常会结合BufferedInputStream(字节缓冲输入流)来使用,例:
try (BufferedInputStream bufferedInputStream = new BufferedInputStream(new FileInputStream("src/main/input.txt"));) {
    // 读取文件的内容并复制到 String 对象中
    String string = new String(bufferedInputStream.readAllBytes());
    System.out.println(string);
} catch (IOException e) {
    System.out.println(e.getMessage());
}DataInputStream用于读取指定类型数据,不能单独使用,必须结合其他流,比如FileInputStream
try (DataInputStream dataInputStream = new DataInputStream(new FileInputStream("src/main/input.txt"));) {
    // 可以读取任意具体的类型数据
    dataInputStream.readBoolean();
    dataInputStream.readInt();
    dataInputStream.readUTF();
} catch (IOException e) {
    System.out.println(e.getMessage());
}ObjectInputStream用于从输入流中读取Java对象(反序列化),ObjectOutputtStream用于将对象写入到输出流(序列化)
try (ObjectInputStream objectInputStream = new ObjectInputStream(new FileInputStream("src/main/object.data"))) {
    MyClass object = (MyClass) objectInputStream.readObject();
} catch (IOException | ClassNotFoundException e) {
    System.out.println(e.getMessage());
}
另外,用于序列化和反序列化的类必须实现
Serializable接口,对象中如果有属性不想被序列化,可以使用transient关键字来修饰。
OutputStream(字节输出流)
OutputStream用于将数据(字节信息)写入到目的地(通常是文件),java.io.OutputStream抽象类是所有字节输出流的父类

常用方法:
write(int b):将特定字节写入输出流write(byte b[]):将数组b写入到输出流,等价于write(b, 0, b.length)write(byte b[], int off, int len):在write(byte b[])方法的基础上增加了off参数(偏移量)和len参数(要读取的最大字节数)flush():刷新此输出流并强制写出所有缓冲的输出字节close():关闭输出流释放相关的系统资源
FileOutputStream是最常用的字节输出流对象,可直接指定文件路径,可以直接输出单字节数据,也可以输出指定的字节数组
try (FileOutputStream fileOutputStream = new FileOutputStream("src/main/output.txt")) {
    byte[] bytes = "this is output.txt".getBytes();
    fileOutputStream.write(bytes);
} catch (IOException e) {
    System.out.println(e.getMessage());
}
运行结果

类似于FileInputStream,FileOutputStream通常也会配合BufferedOutputStream(字节缓冲输出流)来使用
try (BufferedOutputStream bufferedOutputStream = new BufferedOutputStream(new FileOutputStream("src/main/output.txt"))) {
    byte[] bytes = "write something here.".getBytes();
    bufferedOutputStream.write(bytes);

} catch (IOException e) {
    System.out.println(e.getMessage());
}
运行结果:

DataOutputStream用写入指定类型数据,不能单独使用,必须结合其他流,比如FlieOutputStream
try (DataOutputStream dataOutputStream = new DataOutputStream(new FileOutputStream("src/main/output.txt"))) {
    byte[] bytes = "test test test".getBytes();
    dataOutputStream.write(bytes);
} catch (IOException e) {
    System.out.println(e.getMessage());
}ObjectInputStream用于从输入流中读取Java对象(反序列化)
ObjectOutputtStream用于将对象写入到输出流(序列化)
try (ObjectOutputStream objectOutputStream = new ObjectOutputStream(new FileOutputStream("src/main/output.txt"))) {
    MyClass myClass = new MyClass("Feliks", "China");
    objectOutputStream.writeObject(myClass);
} catch (IOException e) {
    System.out.println(e.getMessage());
}
字符流
不管是文件读写还是网络发送请求,信息的最小存储单元都是字节,那为什么I/O流操作要分为字节流操作和字符流操作呢?
- 字符流是由Java虚拟机将字节转换得到的,该过程还是比较耗时
- 如果我们不知道编码类型很容易就会造成乱码问题
将上面input.txt中的文件内容改为中文再次运行
try (InputStream inputStream = new FileInputStream("src/main/input.txt")) {
    // available():返回输入流中可以读取的字节数
    System.out.println("Number of remaining bytes: " + inputStream.available());
    int content;
    // skip(long n):忽略输入流中的n个字节,返回实际忽略的字节数
    long skip = inputStream.skip(2);
    System.out.println("The actual number of bytes skipped: " + skip);
    System.out.println("The content read from file: ");
    while ((content = inputStream.read()) != -1) {
        System.out.print((char) content);
    }
} catch (IOException e) {
    System.out.println(e.getMessage());
}
运行结果:

很明显读取的内容已经变成了乱码
因此,I/O流提供了一个直接操作字符的接口,方便我们平时对字符进行流操作,如果是音频文件、图片等媒体文件用字节流就好,如果涉及到字符的话使用字符流比较好
字符流默认采用的是Unicode编码,我们可以通过构造方法自定义编码。
常用字符编码所占字节数?
utf8:英文占1字节,中文占3字节
unicode:任何字符都占2字节
gbk:英文占1字节,中文占2字节
Reader(字符输入流)
Reader用于从源头(通常是文件)读取数据(字符信息)到内存中,java.io.Reader抽象类是所有字符输入流的父类

Reader用于读取文本,InputStream用于读取原始字节
常用方法
read():从输入流读取一个字符read(char[] cbuf):从输入流中读取一些字符,并将他们存储到字符数组cbuf中,等价于read(cbuf, 0, cbuf.length),实际上也确实是这么实现的public int read(char[] cbuf) throws IOException { return read(cbuf, 0, cbuf.length); }read(char[] cbuf, int off, int len):在read(char[] cbuf)方法的基础上增加了off参数(偏移量)和len参数(要读取的最大字符数)skip(long n):忽略输入流中的n个字符,返回实际忽略的字符数close():关闭输入流并释放相关的系统资源
InputStreamReader是字节流转换为字符流的桥梁,其子类FileReader是基于该基础上的封装,可以直接操作字符文件
// 字节流转换为字符流的桥梁
public class InputStreamReader extends Reader {}
// 用于读取字符文件
public class FileReader extends InputStreamReader {}FileReader演示
try (FileReader fileReader = new FileReader("src/main/input.txt");) {
    int content;
    long skip = fileReader.skip(3);
    System.out.println("The actual number of bytes skipped:" + skip);
    System.out.print("The content read from file:");
    while ((content = fileReader.read()) != -1) {
        System.out.print((char) content);
    }
} catch (IOException e) {
    e.printStackTrace();
}
input.txt

运行结果
The actual number of bytes skipped:3
The content read from file:世界
Writer(字符输出流)
Writer用于将数据(字符信息)写入到目的地(通常是文件),java.io.Writer抽象类是所有字符输出类的父类

Writer用于写入文本,OutputStream用于写入原始字节
常用方法
write(int c):写入单个字符write(char cbuf[]):写入字符数组cbuf,等价于write(cbuf, 0, cbuf.length)write(char cbuf[], int off, int len):在write(char cbuf[])方法的基础上增加了off参数(偏移量)和len参数(要读取的最大字符数)write(String str):写入字符串,等价于write(str, 0, str.length())write(str, 0, str.length()):在write(String str)方法的基础上增加了off参数(偏移量)和len参数(要读取的最大字符数)append(CharSequence csq):将指定的字符序列附加到指定的Writer对象并返回该Writer对象append(char c):将指定的字符附加到指定的Writer对象并返回该Writer对象flush():刷新此输出流并前置写出所有缓冲的输出字符close():关闭输出流释放相关的系统资源
OutputStreamWriter是字符流转换为字节流的桥梁,其子类FileWriter是基于该基础上的封装,可以直接将字符写入到文件
// 字符流转换为字节流的桥梁
public class OutputStreamWriter extends Writer {}
// 用于写入字符到文件
public class FileWriter extends OutputStreamWriter {}FileWriter演示
try (Writer writer = new FileWriter("src/main/output.txt")) {
    writer.write("Hello 我是Feliks,我会写中文");
} catch (IOException e) {
    System.out.println(e.getMessage());
}
output.txt

字节缓冲流
IO操作是很消耗性能的,缓冲流将数据加载到缓冲区,一次性读取/写入多个字节,从而避免频繁的IO操作,提高流的传输效率
字节缓冲流里采用了装饰器模式来增强InputStream和OutputStream子类对象的功能
例如:通过BufferedInputStream(字节缓冲输入流)来增强FileInputStream的功能
try (BufferedInputStream bufferedInputStream = new BufferedInputStream(new FileInputStream("src/main/input.txt"))) {
    String inputString = new String(bufferedInputStream.readAllBytes());
    System.out.println(inputString);
} catch (IOException e) {
    System.out.println(e.getMessage());
}
运行结果

字节流和字节缓冲流的性能差别主要体现在:我们使用两者的时候都是调用write(int b)和read()这两个一次只读取一个字节的方法的时候,由于字节缓冲流内部由缓冲区(字节数组),因此字节缓冲流会先将读取到的字节存放在缓冲区,大幅减少IO次数,提升读取效率
来用write(int b)和read()方法,分别通过字节流和字节缓冲流复制一份文件看看:
@Test
public void testBufferedInputStream() {
    // 开始时间
    long startTime = System.currentTimeMillis();
    try (BufferedInputStream bufferedInputStream = new BufferedInputStream(new FileInputStream("src/Linux.pdf"));
         BufferedOutputStream bufferedOutputStream = new BufferedOutputStream(new FileOutputStream("src/Linux_1.pdf"))) {
        int content;
        while ((content = bufferedInputStream.read()) != -1) {
            bufferedOutputStream.write(content);
        }
    } catch (IOException e) {
        System.out.println(e.getMessage());
    }
    // 结束时间
    long endTime = System.currentTimeMillis();
    System.out.println("使用字节缓冲流复制Linux.pdf所用时间为:" + (endTime - startTime) + "毫秒");
}

@Test
public void testInputStream() {
    // 开始时间
    long startTime = System.currentTimeMillis();
    try (InputStream inputStream = new FileInputStream("src/Linux.pdf");
         OutputStream outputStream = new FileOutputStream("src/Linux_2.pdf")) {
        int content;
        while ((content = inputStream.read()) != -1) {
            outputStream.write(content);
        }
    } catch (IOException e) {
        System.out.println(e.getMessage());
    }
    // 结束时间
    long endTime = System.currentTimeMillis();
    System.out.println("使用普通字节流复制Linux.pdf所用时间为:" + (endTime - startTime) + "毫秒");
}
运行结果:
使用字节缓冲流复制Linux.pdf所用时间为:11毫秒
使用普通字节流复制Linux.pdf所用时间为:672毫秒
很明显两者耗时非常大
但是如果是通过read(byte b[])和write(byte b[], int off, int len)这两个写入一个字节数组的方法,只要字节数组的大小合适,两者的性能差距其实不大,基本可以忽略,来看如下测试代码:
@Test
public void testBufferedInputStreamByteArray() {
    // 开始时间
    long startTime = System.currentTimeMillis();
    try (BufferedInputStream bufferedInputStream = new BufferedInputStream(new FileInputStream("src/Linux.pdf"));
         BufferedOutputStream bufferedOutputStream = new BufferedOutputStream(new FileOutputStream("src/Linux_3.pdf"))) {
        int content;
        byte[] bytes = new byte[4 * 1024];
        while ((content = bufferedInputStream.read(bytes)) != -1) {
            bufferedOutputStream.write(bytes, 0, content);
        }
    } catch (IOException e) {
        System.out.println(e.getMessage());
    }
    // 结束时间
    long endTime = System.currentTimeMillis();
    System.out.println("使用缓冲字节流复制Linux.pdf所用时间为:" + (endTime - startTime) + "毫秒");
}

@Test
public void testFileInputStreamByteArray() {
    // 开始时间
    long startTime = System.currentTimeMillis();
    try (InputStream inputStream = new FileInputStream("src/Linux.pdf");
         OutputStream outputStream = new FileOutputStream("src/Linux_4.pdf")) {
        int content;
        byte[] bytes = new byte[4 * 1024];
        while ((content = inputStream.read(bytes)) != -1) {
            outputStream.write(bytes, 0, content);
        }
    } catch (IOException e) {
        System.out.println(e.getMessage());
    }
    // 结束时间
    long endTime = System.currentTimeMillis();
    System.out.println("使用普通字节流复制Linux.pdf所用时间为:" + (endTime - startTime) + "毫秒");
}
输出结果:
使用缓冲字节流复制Linux.pdf所用时间为:1毫秒
使用普通字节流复制Linux.pdf所用时间为:1毫秒
两者耗时差别不是很大,但是理论上来说文件再大点的话缓冲流的性能会更好一点
BufferedInputStream(字节缓冲输入流)
BufferedInputStream从源头(文件)读取数据(字节信息)到内存的过程中不会一个字节一个字节地读取,而是会先将读取到的字节放在缓存区,并从内部缓冲区单独读取字节,这样可以大幅减少IO次数,提高了读取效率
BufferedInputStream内部维护了一个缓冲区,这个缓冲区就是一个字节数组,阅读源码可知:
public class BufferedInputStream extends FilterInputStream {
	// 缓冲区的默认大小
    private static int DEFAULT_BUFFER_SIZE = 8192;
	// 内部缓冲区数组
    protected volatile byte[] buf;
	// 使用默认的缓冲区大小
    public BufferedInputStream(InputStream in) {
        this(in, DEFAULT_BUFFER_SIZE);
    }
	// 自定义缓冲区大小
    public BufferedInputStream(InputStream in, int size) {
        super(in);
        if (size <= 0) {
            throw new IllegalArgumentException("Buffer size <= 0");
        }
        buf = new byte[size];
    }
}缓冲区的默认大小为8192字节,我们也可通过BufferedInputStream(InputStream in, int size)这个构造方法来指定缓冲区的大小
BufferedOutputStream(字节缓冲输出流)
BufferedOutputStream将数据(字节信息)写入到目的地(文件)的过程中给不会一个字节一个字节的写入,而是会先将要写入的字节存放在缓存区,并从内部缓冲区中单独写入字节,这样就大幅减少了IO次数,提高了读取效率
try (BufferedInputStream bufferedInputStream = new BufferedInputStream(new FileInputStream("src/Linux.pdf"));
     BufferedOutputStream bufferedOutputStream = new BufferedOutputStream(new FileOutputStream("src/Linux_3.pdf"))) {
    int content;
    byte[] bytes = new byte[4 * 1024];
    while ((content = bufferedInputStream.read(bytes)) != -1) {
        bufferedOutputStream.write(bytes, 0, content);
    }
} catch (IOException e) {
    System.out.println(e.getMessage());
}类似于BufferedInputStream,BufferedOutputStream内部也维护了一个缓冲区,而且这个缓冲区的大小也是8192字节
public class BufferedOutputStream extends FilterOutputStream {
	// 内部缓冲区数组
    protected byte buf[];
	// 设置默认的缓冲区大小
    public BufferedOutputStream(OutputStream out) {
        this(out, 8192);
    }
	// 自定义缓冲区大小
    public BufferedOutputStream(OutputStream out, int size) {
        super(out);
        if (size <= 0) {
            throw new IllegalArgumentException("Buffer size <= 0");
        }
        buf = new byte[size];
    }
}
字符缓冲流
BufferedReader(字符缓冲输入流)
BufferedReader(字符缓冲输入流)和BufferWriter(字符缓冲输入流)类似于BufferedInputStream(字节缓冲输入流)和BufferedOutputStream(字节缓冲输出流),内部维护了一个字符数组作为缓冲区,只不过前者是用来操作字符信息
BufferedReader
public class BufferedReader extends Reader {
    private char[] cb;

    private static int defaultCharBufferSize = 8192;

    public BufferedReader(Reader in, int sz) {
        super(in);
        if (sz <= 0)
            throw new IllegalArgumentException("Buffer size <= 0");
        this.in = in;
        cb = new char[sz];
        nextChar = nChars = 0;
    }

    public BufferedReader(Reader in) {
        this(in, defaultCharBufferSize);
    }
}
BufferedWriter(字符缓冲输出流)
public class BufferedWriter extends Writer {
    private char cb[];

    private static int defaultCharBufferSize = 8192;

    public BufferedWriter(Writer out) {
        this(out, defaultCharBufferSize);
    }

    public BufferedWriter(Writer out, int sz) {
        super(out);
        if (sz <= 0)
            throw new IllegalArgumentException("Buffer size <= 0");
        this.out = out;
        cb = new char[sz];
        nChars = sz;
        nextChar = 0;
    }
}
打印流
来看看常用的输出语句
System.out.println("Hello!");
System.out.print("Hello!");System.out实际是用于获取一个PrintStream对象,print方法世界调用的是PrintStream对象的write方法

PrintStream对象属于字节打印流,与之对应的是PrintWriter(字符打印流)
PrintStream是OutputStream的子类,PrintWriter是Writer的子类
public class PrintStream extends FilterOutputStream implements Appendable, Closeable {}
public class PrintWriter extends Writer {}
随机访问流
随机访问流指的是支持随意跳转到文件的任意位置进行读写的RandomAccessFile
RandomAccessFile的构造方法如下:
public RandomAccessFile(File file, String mode)
    throws FileNotFoundException
{
    this(file, mode, false);
}

private RandomAccessFile(File file, String mode, boolean openAndDelete)
    throws FileNotFoundException
{
    String name = (file != null ? file.getPath() : null);
    int imode = -1;
    if (mode.equals("r"))
        imode = O_RDONLY;
    else if (mode.startsWith("rw")) {
        imode = O_RDWR;
        rw = true;
        if (mode.length() > 2) {
            if (mode.equals("rws"))
                imode |= O_SYNC;
            else if (mode.equals("rwd"))
                imode |= O_DSYNC;
            else
                imode = -1;
        }
    }
    if (openAndDelete)
        imode |= O_TEMPORARY;
    if (imode < 0)
        throw new IllegalArgumentException("Illegal mode \"" + mode
                                           + "\" must be one of "
                                           + "\"r\", \"rw\", \"rws\","
                                           + " or \"rwd\"");
    @SuppressWarnings("removal")
    SecurityManager security = System.getSecurityManager();
    if (security != null) {
        security.checkRead(name);
        if (rw) {
            security.checkWrite(name);
        }
    }
    if (name == null) {
        throw new NullPointerException();
    }
    if (file.isInvalid()) {
        throw new FileNotFoundException("Invalid file path");
    }
    fd = new FileDescriptor();
    fd.attach(this);
    path = name;
    open(name, imode);
    FileCleanable.register(fd);   // open sets the fd, register the cleanup
}我们可以自己指定mode(读写模式)
r:只读模式rw:读写模式rws:相对于rw,rws同步更新对”文件的内容“或”元数据“的修改到外部存储设备rwd:相对于rw,rwd同步更新对”文件的内容“的修改到外部存储设备
文件内容:文件中实际保存的数据
元数据:用来描述文件属性比如文件的大小信息、创建时间和修改时间
RandomAccessFile中有一个文件指针用来表示下一个将要被写入或读取的字节所处的位置,可以通过里面的seek(long pos)方法来设置文件指针的偏移量(距离文件开头pos个字节处)。如果想要获取文件指针当前的位置,可以使用getFilePointer()方法
代码演示:
input.txt
I believe there is a person who brings sunshine into your life.
That person may have enough to spread around. But if you really
have to wait for someone to bring you the sun and give you a
good feeling, then you may have to wait a long time.
代码
@Test
public void testRandomAccessFile() {
    try (RandomAccessFile randomAccessFile = new RandomAccessFile(new File("src/main/input.txt"), "rw")) {
        System.out.println("读取之前的偏移量:" + randomAccessFile.getFilePointer() + ",读取到的字符:" + (char) randomAccessFile.read() + ",读取之后的偏移量:" + randomAccessFile.getFilePointer());
        // 将当前指针偏移量设为6
        randomAccessFile.seek(6);
        System.out.println("读取之前的偏移量:" + randomAccessFile.getFilePointer() + ",读取到的字符:" + (char) randomAccessFile.read() + ",读取之后的偏移量:" + randomAccessFile.getFilePointer());
        // 从偏移量为7的位置开始往后写入字节数据
        byte[] bytes = {'(', 't', 'e', 's', 't', ')'};
        randomAccessFile.write(bytes);
        // 将指针偏移量置回0
        randomAccessFile.seek(0);
        System.out.println("读取之前的偏移量:" + randomAccessFile.getFilePointer() + ",读取到的字符:" + (char) randomAccessFile.read() + ",读取之后的偏移量:" + randomAccessFile.getFilePointer());

    } catch (IOException e) {
        System.out.println(e.getMessage());
    }
}
运行结果:
读取之前的偏移量:0,读取到的字符:I,读取之后的偏移量:1
读取之前的偏移量:6,读取到的字符:e,读取之后的偏移量:7
读取之前的偏移量:0,读取到的字符:I,读取之后的偏移量:1
input.txt
I belie(test)re is a person who brings sunshine into your life.
That person may have enough to spread around. But if you really
have to wait for someone to bring you the sun and give you a
good feeling, then you may have to wait a long time.对比前后两份input.txt可知,RandomAccessFile的write方法在写入对象的时候如果对应的位置已经有数据的话,会将其覆盖掉
byte[] bytes = {'(', 't', 'e', 's', 't', ')'};
randomAccessFile.write(bytes);RandomAccessFile常见的一个应用就是实现大文件的断点续传
RandomAccessFile的实现依赖于FileDescriptor(文件描述符)和FileChannel(内存映射文件)
public class RandomAccessFile implements DataOutput, DataInput, Closeable {
    private FileDescriptor fd;
    private volatile FileChannel channel;
    // ......
}
Java IO 中的设计模式?
装饰器模式
可以在不改变原有对象的情况下拓展其功能
装饰器模式通过组合替代继承来扩展原始类的功能,在一些继承关系比较复杂的场景(例如IO这一场景各种类的继承关系)更加实用
对于字节流来说,FilterInputStream(对应输入流)和FilterOutputStream(对应输出流)是装饰器模式的核心,分别用于增强InputStream和OutputStream子类对象的功能
BufferedInputStream(字节缓冲输入流)、DataInputStream等等都是FilterInputStream的子类

BufferedOutputStream(字节缓冲输出流)、DataOutputStream等等都是FilterOutputStream的子类

通过BufferedInputStream(字节缓冲输入流)来增强FileInputStream的功能。
public BufferedInputStream(InputStream in) {
    this(in, DEFAULT_BUFFER_SIZE);
}

public BufferedInputStream(InputStream in, int size) {
    super(in);
    if (size <= 0) {
        throw new IllegalArgumentException("Buffer size <= 0");
    }
    buf = new byte[size];
}可以看到上面BufferedInputStream的构造器中的参数就是InputStream
BufferedInputStream演示:
@Test
public void testBufferedInputStream() {
    try (BufferedInputStream bufferedInputStream = new BufferedInputStream(new FileInputStream("/src/main/input.txt"))) {
        int content;
        bufferedInputStream.skip(2);
        while ((content = bufferedInputStream.read()) != -1) {
            System.out.println((char) content);
        }
    } catch (IOException e) {
        e.printStackTrace();
    }
}为什么不写一个BufferedFileInputStream?
你可以想一下InputStream的子类有多少个,如果分别都为他们写一个缓冲流,工程量该有多大,而且InputStream里的继承关系太复杂了,如果都这样去定制一个对应的缓冲输入流,实在是太麻烦了
ZipInputStream和ZipOutputStream都可以分别对BufferedInputStream和BufferedOutputStream进行增强
ZipInputStream zipInputStream = new ZipInputStream(new BufferedInputStream(new FileInputStream("/src/main/input.txt")));
ZipOutputStream zipOutputStream = new ZipOutputStream(new BufferedOutputStream(new FileOutputStream("src/main/output.txt")));看一下他们里面的代码就可以知道ZipInputStream和ZipOutputStream分别继承自InflaterInputStream和DeflaterOutputStream
public class InflaterInputStream extends FilterInputStream {}
public class DeflaterOutputStream extends FilterOutputStream {}
这也是装饰器模式中很重要的一个特性,可以对原始类嵌套使用多个装饰器
为了实现这一效果,装饰器类需要跟原始类继承相同的抽象类或者实现相同的接口,上面所看到的这些IO相关的装饰类其共同父类是InputStream和OutputStream
对于字符流来说:
BufferedReader可以用来增强Reader(字符输入流)子类的功能
new BufferedReader(new InputStreamReader(new FileInputStream("/src/main/input.txt"), "UTF-8"));BufferedWriter可以用来增强Writer(字符输出流)子类的功能
new BufferedWriter(new OutputStreamWriter(new FileOutputStream("/src/main/output.txt"), "UTF-8"));对于IO流中的装饰器模式应用的例子没有必要特意地去记忆,搞清楚装饰器模式的核心后我们在使用的时候自然就会知道哪些地方用到了装饰器模式了
适配器模式
主要用于接口互不兼容的类的协调工作
该模式中存在被适配的对象或类称为适配者(Adaptee),作用于适配者的对象或者类称为适配器(Adapter)
适配器(Adapter)
- 对象适配器:使用组合关系来实现
- 类适配器:使用继承关系来实现
IO流中的字符流和字节流的接口不同,他们之间可以协调工作就是基于对象适配器来做的,通过适配器可以将字节流对象适配成一个字符流对象,这样我们可以通过字节流对象来读取或者写入字符数据
InputStreamReader和OutputStreamWriter就是两个适配器,同时也是字节流和字符流之间的桥梁
InputStreamReader内部使用了StreamDecoder流解码器对字节进行编码,实现字节流到字符流的转换

OutputStreamWriter内部使用了StreamEncoder流编码器对字符进行编码,实现字符流到字节流的转换

InputStream和OutputStream的子类是被适配者,InputStreamReader和OutputStreamWriter是适配器
// BufferedReader增强InputStreamReader的功能(装饰器模式),InputStreamReader是适配器,FileInputStream是被适配的类
new BufferedReader(new InputStreamReader(new FileInputStream("/src/main/input.txt")));InputStreamReader部分源码
public class InputStreamReader extends Reader {
    private final StreamDecoder sd;

    public InputStreamReader(InputStream in) {
        super(in);
        sd = StreamDecoder.forInputStreamReader(in, this,
                Charset.defaultCharset()); // ## check lock object
    }

    public int read() throws IOException {
        return sd.read();
    }
}OutputStreamWriter部分源码
public class OutputStreamWriter extends Writer {
    private final StreamEncoder se;

    public OutputStreamWriter(OutputStream out) {
        super(out);
        se = StreamEncoder.forOutputStreamWriter(out, this,
                Charset.defaultCharset());
    }

    public void write(int c) throws IOException {
        se.write(c);
    }
}
适配器模式和装饰器模式的区别?
装饰器模式
更侧重于动态地增强原始类的功能,装饰器类需要跟原始类继承相同的抽象类或者实现相同的接口,并且装饰器模式支持对原始类嵌套使用多个装饰器
适配器模式
更侧重于让接口不兼容而不能交互的类可以一起工作,当我们调用适配器对应的方法时,适配器内部会调用适配者类或者和适配类相关的类的方法。
工厂模式
工厂模式用于创建对象,NIO中大量用到了工厂模式,比如:
Files类中的newInputStream方法创建InputStream对象(静态工厂)Paths类的get方法创建Path对象(静态工厂)
Files.newInputStream(Paths.get("src/main/input.txt"));还有ZipFileSystem类(sun.nio包下的类,属于java.nio相关的一些内部实现)的getPath的方法创建Path对象(简单工厂)
观察者模式
NIO中的文件目录监听服务使用到了观察者模式
NIO中的文件目录监听服务基于WatchService接口和Watchable接口,WatchService属于观察者,Watchable属于被观察者
public interface WatchService extends Closeable {}
public interface Watchable {}Watchable接口定义了一个用于将对象注册到WatchService(监听服务)并绑定监听事件的方法register
public interface Watchable {
    WatchKey register(WatchService watcher,
                      WatchEvent.Kind<?>[] events,
                      WatchEvent.Modifier... modifiers)
            throws IOException;

    WatchKey register(WatchService watcher, WatchEvent.Kind<?>... events)
            throws IOException;
}WatchService同于监听文件目录的变化,同一个WatchSerivce对象能够监听多个文件目录
Path类register方法的第二个参数events(需要监听的事件),是一个可变长参数,即可以同时监听多个事件
StandardWatchEventKinds.ENTRY_CREATE:文件创建StandardWatchEventKinds.ENTRY_DELETE:文件删除StandardWatchEventKinds.ENTRY_MODIFY:文件修改
@Test
public void testWatchService() throws Exception {
    // 创建一个WatchService对象
    WatchService watchService = FileSystems.getDefault().newWatchService();

    // 初始化一个被监控文件夹的Path类
    Path path = Paths.get("src/main");
    // 将这个path对象注册到WatchService中
    WatchKey watchKey = path.register(watchService, StandardWatchEventKinds.ENTRY_CREATE, StandardWatchEventKinds.ENTRY_MODIFY);
}register方法返回WatchKey对象,通过该对象可以获取事件的具体信息,比如文件目录下是创建、删除还是修改了文件,以及创建、删除或者修改的文件具体名称是什么
@Test
public void testWatchService() throws Exception {
    // 创建一个WatchService对象
    WatchService watchService = FileSystems.getDefault().newWatchService();

    // 初始化一个被监控文件夹的Path类
    Path path = Paths.get("src/main");
    // 将这个path对象注册到WatchService中
    WatchKey watchKey = path.register(watchService, StandardWatchEventKinds.ENTRY_CREATE, StandardWatchEventKinds.ENTRY_MODIFY);
    while ((watchKey = watchService.take()) != null) {
        for (WatchEvent<?> event : watchKey.pollEvents()) {
            // 调用WatchEvent对象的方法做一些事情,比如输出事件的具体上下文信息
            System.out.println(event.context());
        }
        watchKey.reset();
    }
}